
To set up Facebook Business Manager, go to business.facebook.com, find Create Account, use your personal Facebook Profile to log in, and enter your business name, personal name, and business email. Confirm your email address, link your Business page and ad account, assign your team member if needed, and start running ads. The complete process requires 10-15 minutes, and it does not cost a single penny.
Creating the Business Manager will help you manage your Pages, ad accounts, pixel, Instagram accounts, and team permissions from a single place without sharing personal logins. You can keep your personal profile separate with this manager. However, many people make mistakes while creating the account. So this article will guide you through the right process of creating the account, pre-setup requirements, and common errors to avoid.
Before you click: Is this the right moment to set one up?
Setup is not that difficult. But setting up the Business Manager at the wrong time can get your account flagged or banned. So follow this table before you start creating.
| Your situation | Set up now? | Why |
|---|---|---|
| Already running ads or have paying clients. | Yes – Now. | You need separate ownership and role to control everything. |
| You manage multiple Pages or an Instagram ad account. | Yes | Single dashboard allows smooth management without juggling logins and shared passwords. |
| New Facebook profile, created this month/week. | Wait | New profiles are low-trust, triggering identity checks. Wait for a few months. |
| Single creator, one Page, boosting posts only. | Not yet. | You can boost without the Business Manager. |
Things you need: Facebook Business Manager setup requirements
You need a identity confirmed personal account, 2FA, business email, payment method, and enough time to set up before setting up the Business Manager. Having these 5 things will make the setup smoother. Let’s check the details.
- A personal Facebook profile – You need a personal Facebook profile with your official first and last name to create a Business Manager. Meta often asks you to verify your identity with your Government ID. So any fake names will create more trouble during verification.
- Two-factor authentication (2FA) – You need to turn on 2FA before setting up the Business Manager. It will protect your account from hackers and make sure to ensure this 2FA for your other team members once you assign the roles.
- A business email – It will be needed to add to your account’s contact information. However, it is not for your public profile. You need to add it in the Accounts Center.
- A payment method – Without a supported card or PayPal, you cannot run ads. Using direct debit cards and failed payments often disables your Business Manager.
- Enough time – If you want to create the account now and run ads, this is not a good idea. Sudden activity will flag your account as spam. Take a few weeks and warm up the account before running an ad.
That’s why many people directly buy aged, warmed-up, and verified Business Manager accounts to run ads quickly. These accounts are suitable for running ads with a higher spending budget.

How to set up Facebook Business Manager: step-by-step
You can set up the Business Manager within 10-15 minutes once you have the listed requirements mentioned above, and the process is free. Follow these 7 steps below.
Step 1: Create a Business Manager account
Login your personal Facebook account first. Go to business.facebook.com > Create Account and log in to your profile using the email and password. Enter your business name, your name, and your business email address, and click Submit. Check your email for a confirmation email and click the link to verify.

Step 2: Add business information and lock down security
In Business Settings, enter your business information such as business address, phone number, website, and TAX ID. Add a second administrator as your backup. It will help you recover your account later if you are locked out. Set 2FA using an authenticator app instead of SMS. You will find it under Business options. It will force every member to use 2FA for their own account, ensuring stronger defence against suspension.

Step 3: Add or create your Facebook Page
If you already have a Facebook page, you need to add it to the Business Manager. Go to Accounts > Pages > Add and “add a page’ if you have a page. If you don’t have a page, select ‘create a new page’ and create a page as per your business.
If you need access to other pages of your clients, click ‘request access to a Page’. When handling clients, always select ‘Request Access to Page’ and never select ‘Add’ since it will add those clients’ pages to your Business Manager as an owner. A mistake on those pages can cause serious disputes to your Business Manager.

Step 4: Add or create an ad account
Once you have added the page, it is time to add the ad account. Go to Accounts > Ad Accounts > Add and choose your existing ad account to add. If you do not have an ad account, you can create one now by clicking ‘create a new one’.
To add others’ ad accounts, click ‘request access’ and add those ad accounts under your Business Manager. Remember that you cannot move an ad account once created and cannot change the currency and time zone. Create an ad account under the Business Manager only when you own it permanently.

Step 5: Connect Instagram, WhatsApp, and Threads
You can connect your Instagram, WhatsApp, and Threads under Accounts. Log in to your Instagram account when prompted to connect to Instagram. You can also connect Threads and WhatsApp Business for WhatsApp ads.

Step 6: Add people and set permissions
Find Users > People > Add and add your team members by entering their email. You can select their role and access level accordingly. Go to Partners to add an agency or another business using their Portfolio ID. You may get confused here between individual roles and partners. Basically, individuals are for inside the organization, and Partners are for outside businesses.
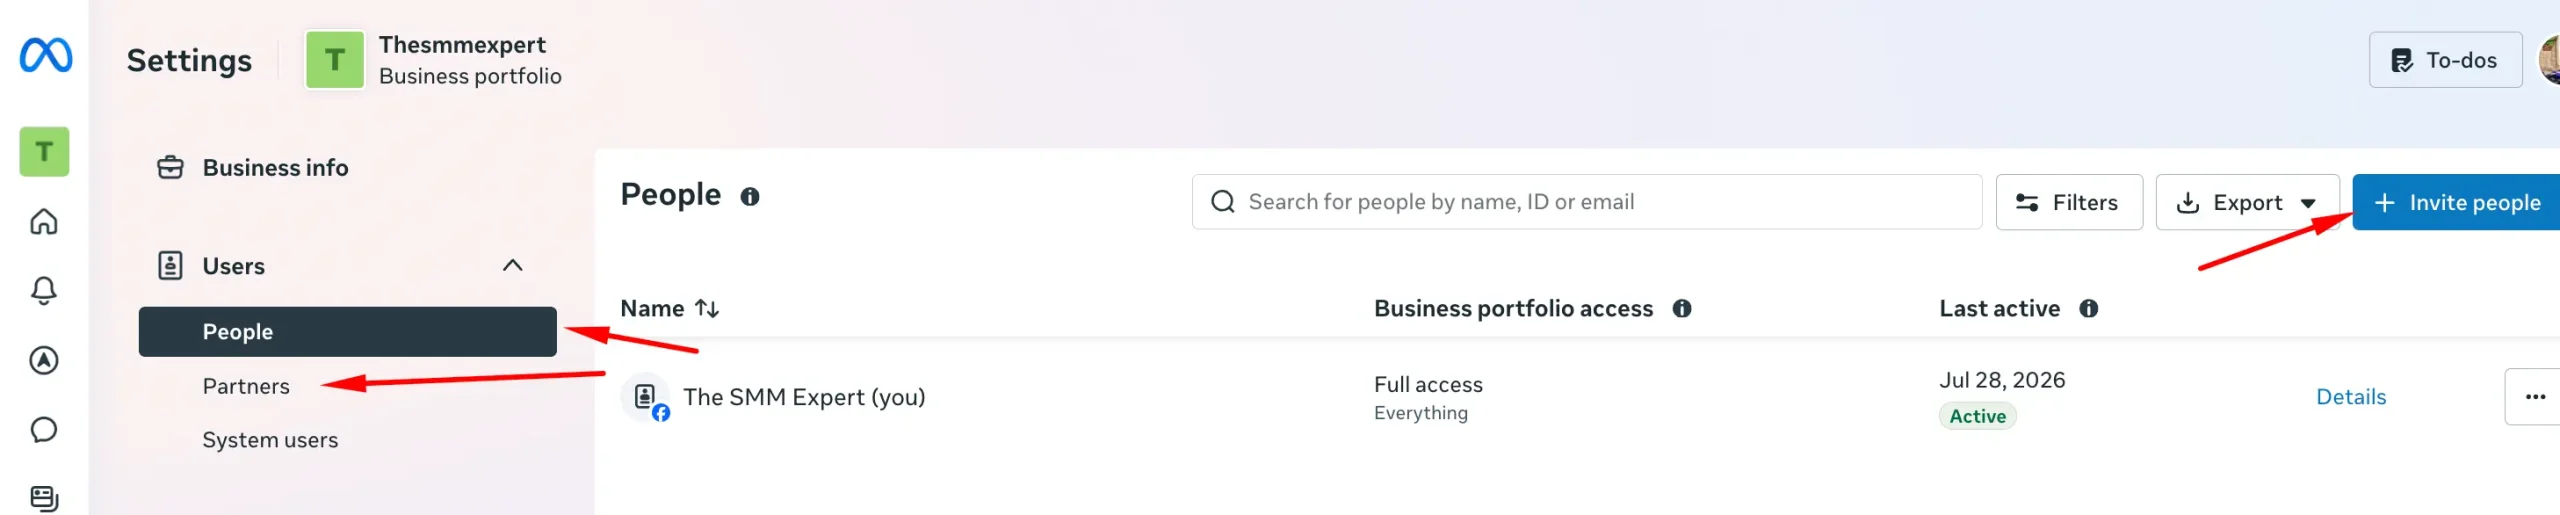
Step 7: Install Meta Pixel and verify domain
Create a Facebook Pixel (currently known as Meta Pixel) under Data Sources and install it on your website to track performance. Then verify your domain under Brand Safety. It protects your URLs from misuse.

If you don’t want this hassle and want to get the ad-ready account, you can check TheSmmExpert and their services. They offer Business Manager, ad accounts, and other important facilities to make your marketing easier.
Facebook Business Manager permission levels explained.
Facebook Business Manager offers different roles and permissions so you can allow different people to different assets without losing control. Here are the permission levels and their control.
- Business Admin – It allows the user full control over the Business Manager, including adding new members, changing settings, and so on. You must use trusted people for this role and never assign any employee to this role.
- Business Employee – This role allows users to access the asset but cannot change the settings or manage other members.
- Finance editors – They can edit the invoice, billing details, and credit cards.
- Finance Analyst – This role allows users to check the invoices, business spending, and financial reports.
- Ad account roles – In the ad accounts, you can grant access to Admin (full control), Advertiser (create and edit campaigns), and Analyst (read-only reporting).
- Page roles: Different roles to control content, advertising, messaging, and analytics separately.
Five setup mistakes, ranked by how hard they are to undo
- Step 4: Creating an ad account under the wrong Business Manager – Your ad account belongs to the Business Manager that creates it. You cannot move it later. If you create an ad account for your client inside the Business Managers, you cannot hand it over later. So be careful here.
- Step 4: Choosing the wrong currency or time zone – These are also non-changeable. You cannot change them later, and deleting the account is the only option for changing it. But it will delete the spending trust and history as well. So set the currency and time according to the original business location.
- Step 3-4: Clicking “Add” instead of “Request Access” for a client’s Page – Adding the page will trigger the ownership disputes and can lock the real users out. You must always click “Request Access” for the assets you do not own to ensure proper management rights.
- Step 2: Skipping the backup admin and forced 2FA – If you are the single admin, you cannot recover the Business Manager once hacked. Besides, forced 2FA prevents a lockout.
- Creating a second Business Manager to escape a problem – If you messed up with an account, do not open a new account without solving the problem. Meta can easily detect the account and quickly flag it too.
Frequently asked questions
Is Facebook Business Manager free?
Yes, Facebook Business Manager is free to create and use for everyone in every region. It allows you to manage and control the assets and check analytics for free. You need to pay only when you run advertisements.
What is the difference between Facebook Business Manager and Meta Business Suite?
Facebook Business Manager runs in the background and manages all assets, whereas Meta Business Suite runs on the frontend for regular activities.
Do I need a Facebook Business Manager to run Instagram ads?
You can boost an Instagram post without a Business Manager, but you cannot use the ads manager without this. Besides, this tool unlocks proper audience targeting, professional reporting, and campaign objectives.
Can I manage multiple businesses in one Business Manager account?
Yes, you can manage multiple businesses in a single Business Manager account, but each Business Manager should represent a single entity. It separates ownership and billing.
Can others see my personal Facebook profile through Business Manager?
No. Other people cannot see your personal Facebook Profile or personal information through Business Manager.
What if I delete my Business Manager account?
Deleting the Business Manager will remove and delete all assets such as pages, ad accounts, and others permanently.

