
Meta’s setup screen looks like a maze with portfolios, Business Suite, permissions, ad accounts, and dozens of other buttons. It looks even scarier when you are doing it for the first time. On the other hand, you want to run Facebook ads for your business, personal needs, or organizations.
However, opening an Ad account on Facebook takes less than 15 minutes if you know the process. Set up your Business Portfolio, connect your business page, add a new ad account, and set up the name and other things.
Do not skip the business verification and do not lock in a setting. This guide will walk you through the exact process so that you can easily set up the ad account.
What is a Facebook (Meta) ad account?
A Facebook ad account is different from your Facebook profile. It holds your payment method, user permissions, audience, and performance data inside the Meta Business Portfolio. Meta officially declares it a ‘Meta Ad Account’ because it serves across Instagram, WhatsApp, Messenger, Facebook, and Audience Network. Consider this as your advertising bank account, from where you can run ads to different platforms. Facebook account is your personal profile, where an Ad account is your office, where you control the money, campaigns, and targeting.
What you need before you start
You need four things before creating an ad account, and having these up front is important to make the process smoother. These include a personal Facebook profile, a Business Page, a Meta Business Portfolio, and a valid payment method.
Here is the full checklist for you:
- A personal Facebook profile – You need your personal profile to verify your identity and be attached as an admin of the account. However, you cannot advertise from your personal account. It will work as a login method.
- A Facebook Business Page – A page will be required to run ads. You can create your official business page now or later during setup.
- A Meta Business Portfolio – It will act as a container to host your pages, ad accounts, and pixels. You will set this up inside Meta Business Suite at business.facebook.com.
- A valid payment method – A dual-currency card if Meta does not approve your local currency, or a credit/debit card or PayPal for approved currency.
How to create a Facebook ad account: step-by-step
To create a Facebook ad account, you need to set up your business portfolio, connect your business page, add a new ad account, and configure name, currency, and payment. Here are the details.
Step 1 – Set up your Meta Business Portfolio
Go to business.facebook.com > Create a Business Portfolio> Enter your business name, your name, and email > Create. The Business Portfolio will be created and act as a central hub for every asset.
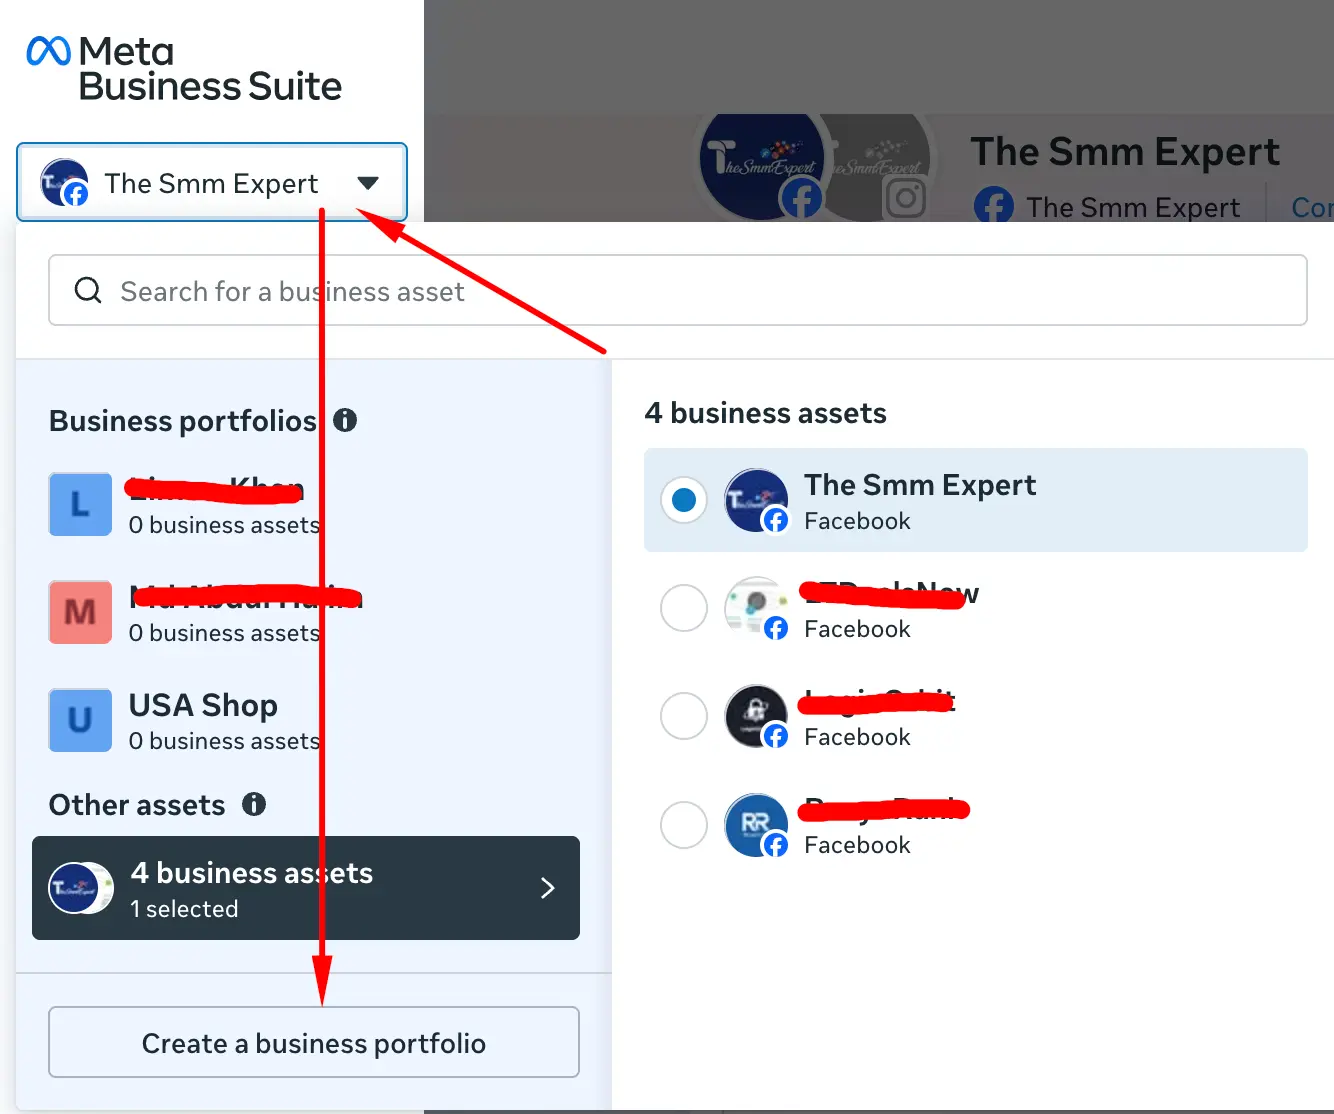
Step 2 – Connect your Facebook Page (and Instagram)
You will find the Pages in the left panel. Open the page and click + Add to connect your existing business page. You can create a page here as well. Open your Instagram account if you want to advertise there. Add your Instagram login so you can remove interruptions during campaign setup.

Step 3 – Create the ad account
Click Settings > navigate to Ad accounts > Create > enter info > Next > choose portfolio > agree to terms > Create ad account.

Step 4 – Choose Your Time Zone & Currency Carefully.
When entering the info, you need to add your name, select your time zone, and choose the right currency. Remember that you cannot change the currency and time zone later. So choose the time zone and currency properly.
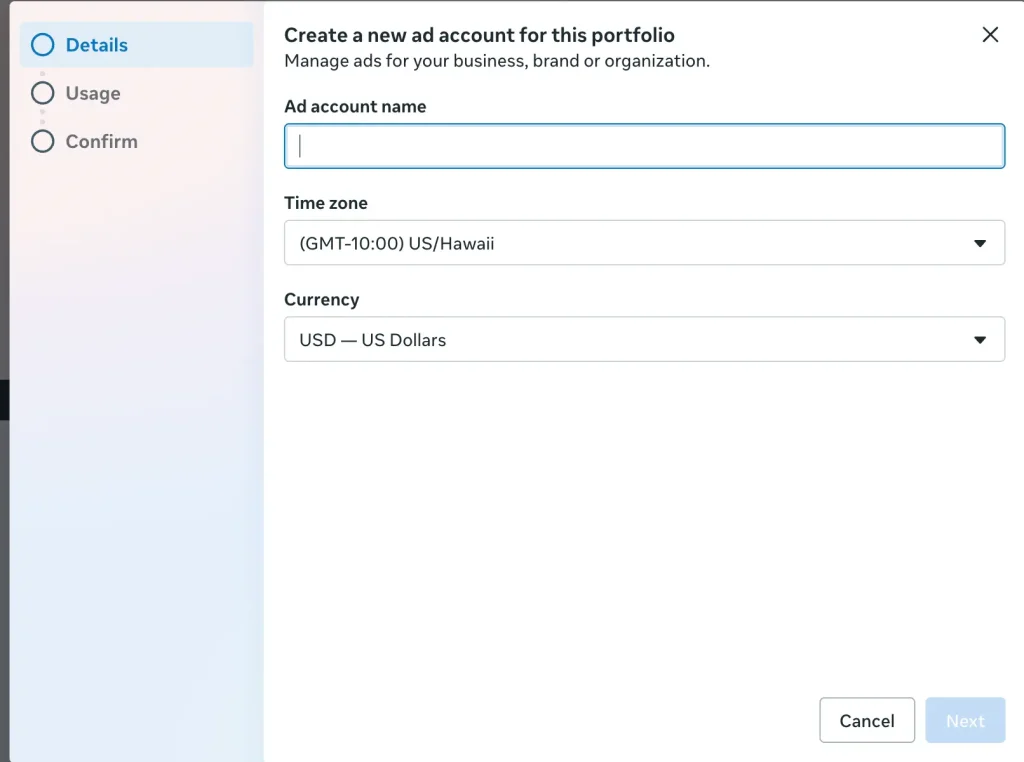
Step 5 – Assign who the account is for
Meta will ask whether the ad account is for you or a client. Choose the right option and click Next. Accept the terms and click Create ad account. Be honest here since it matters, especially if you are an agency.
Step 6 – Click On Billing & payments
You can click Add Payment Method now or later. In the left panel, you will see Billing & payments. Click there and then tap Add payment method.
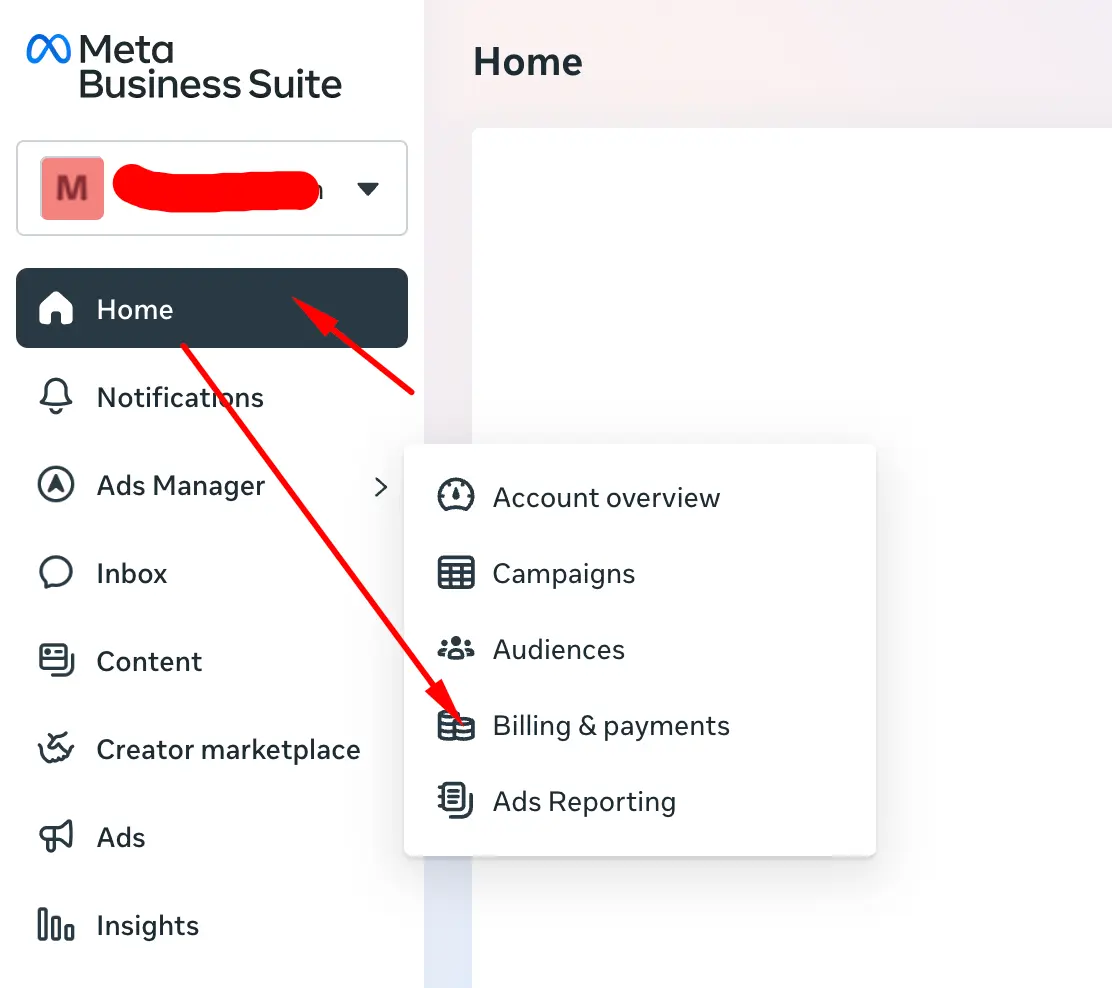
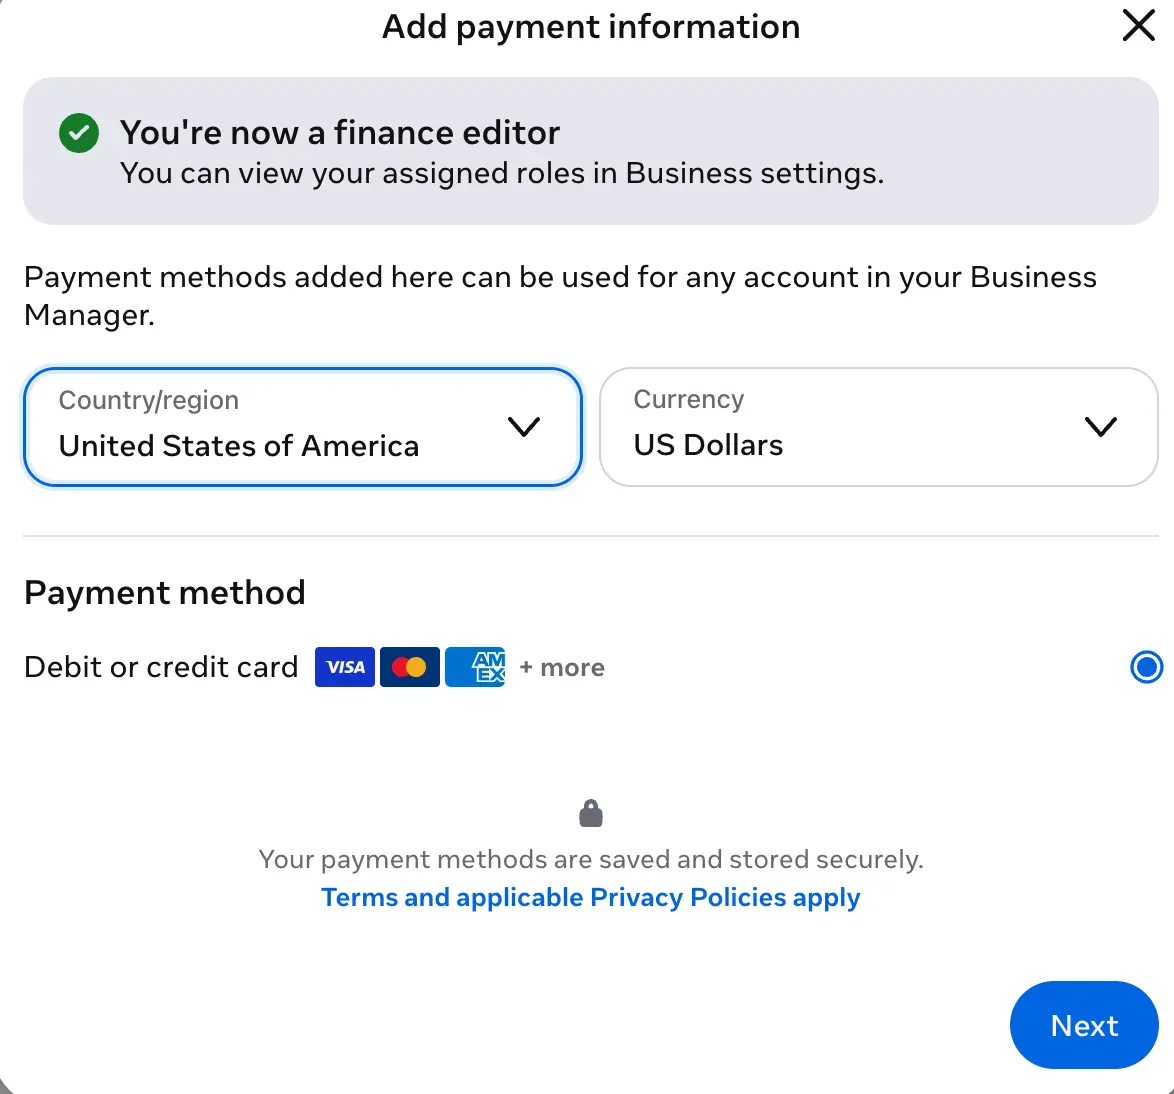
Step 7 – Add your payment method
Enter your payment card or PayPal details to enable the account for spending. Don’t worry about the charge since nothing will be charged until you run a campaign and hit the threshold.
Step 8 – Set roles and permissions
Go to People > Invite people and then enter every teammate’s email to assign a role. The Admin will have full control over the account, the Advertiser can create and run ads, and an Analyst can view the campaigns for future analysis. Meta suggests you add the fewest admin roles possible to keep your account secured.
4 things to get right so your account doesn’t get restricted
One of the main challenges new Facebook ad accounts face is restriction. That’s why smart people and agencies buy aged and verified Facebook ad accounts to avoid this hassle. It happens due to unverified business, weak security, or a break in ad policies. If you can handle these things properly, the chances of restriction will be lower.
- Verify your business: Go to the Security Center to verify the business since it signals legitimacy and assures Meta that you will not spam. Verified accounts face fewer campaign blocks or account bans.
- Start with a low spend limit: Do not start with a higher spending limit. Start small to warm your account, and the system will increase your spending with time.
- Turn on two-factor authentication: Meta suggests Business Portfolios use 2FA to prevent hacking. Add a second admin as well in case you are locked out.
- Follow ad policies from the beginning: Read the policies when you create an ad account and stick to them. Do not use restricted content, misleading claims, and non-compliant landing pages for quick growth.
You can get aged and verified ad accounts, Business Managers, and profiles from TheSmmExpert if you want to avoid those steps and get into the business directly.
Creating an ad account for a client (agencies and freelancers)
To run campaigns for your client, ask them to give access to their ad accounts through Meta Business Manager. You can create one under your own portfolio, but that will not make the client the legal owner of the account and billing. Creating under your own portfolio often leads to disputes when the relationship ends.
So ask the client for their Business ID and ask them to assign you as a partner. If you must create an account on their behalf, write an agreement beforehand on who owns the account and who will pay the bill. Remember that a single verified business can have multiple ad accounts. So you can create different ad accounts for different clients.
What’s next – launching your first campaign
Once you are done with account creation, verification, and funding, build a campaign in ad manager. You can choose campaigns for awareness, engagement, traffic, leads, promotion, or sales. Meta allows you to set daily or lifetime budgets, pick the ad placement, define the audience, and upload your creatives. Meta will review your ad and make it live within 24 hours.
Frequently asked questions
Do I need a Facebook Page to create an ad account?
Yes. You need a Facebook Business Page to run ads using the ad account. The ads are published in your page name. You can create the page before or during ad account setup and set the roles.
How many ad accounts can I have?
You will have one ad account when you open a Facebook account. But you can add more accounts after making the first payment. The limits will rise with account age and spend history.
Can I change my ad account’s currency or time zone later?
No. You cannot change the currency and time zone once you set them during ad account creation. The only way to change them is to delete or close the existing ad account and create a new one.
Is creating a Facebook ad account free?
Yes, you can create an ad account for free, but you need to pay to run ads.
Why is my new ad account’s spending limit so low?
If you have just opened an ad account, the spending limit will be low since Meta caps the daily spending for a new account to prevent fraud. The limit will increase automatically once you start running campaigns regularly.
What do I do if my ad account gets disabled?
You need to open Account Quality/Business Support Home in Meta Business Suite and submit an appeal. You can check our guide on how to recover disabled Facebook ad accounts [Facebook Ad Account Disabled].

